Welcome to the central hub for everything related to coffee and espresso machines. From beginner knowledge to advanced brewing techniques, this page connects you to the key categories that organize all of our in‑depth guides and reviews. Start here to explore the right path for your coffee journey.
Learn the fundamentals: differences between coffee and espresso, bean varieties, roast levels, crema, water quality, and essential barista terminology.
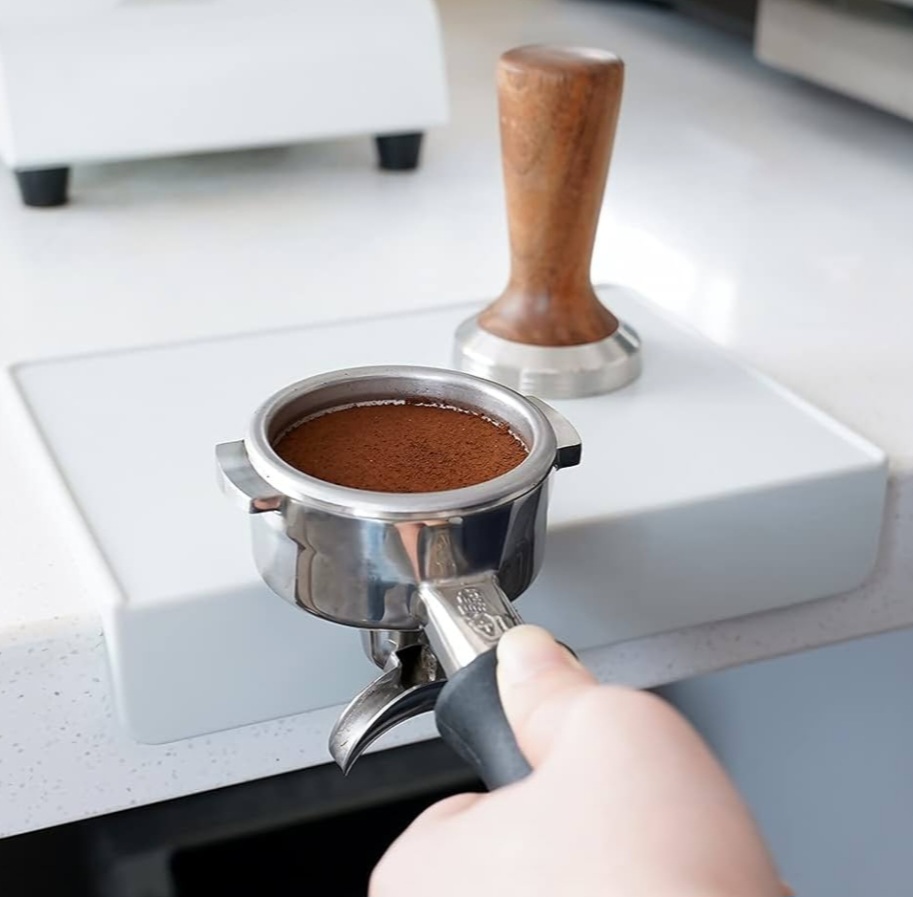
Your grinder just finished its work, and you’re ready to dose your portafilter. But as you transfer those precious grounds, half of them seem to have other plans—scattering across your counter, hiding behind your machine, and generally making your espresso routine feel more like a cleanup operation than a coffee ritual.
Sound familiar? You’re not alone. Even experienced home baristas struggle with the messy reality of espresso preparation. The difference between frustrating coffee sessions and smooth, professional-looking workflows often comes down to three essential tools that many beginners overlook.
Dosing funnels, distributors, and WDT tools might seem like expensive accessories, but they’re actually problem-solving investments that transform your espresso routine from chaotic to controlled. The question isn’t whether you need them—it’s which ones will work best for your specific setup and skill level.
Understanding the Espresso Workflow Trinity
These three tools work together to solve the most common problems in home espresso preparation, each addressing a specific challenge that can make or break your shots.
Dosing Funnels solve the mess problem. They create a temporary extension of your portafilter basket, ensuring every precious gram of coffee ends up where it belongs instead of decorating your countertop. Think of them as insurance against waste and frustration.
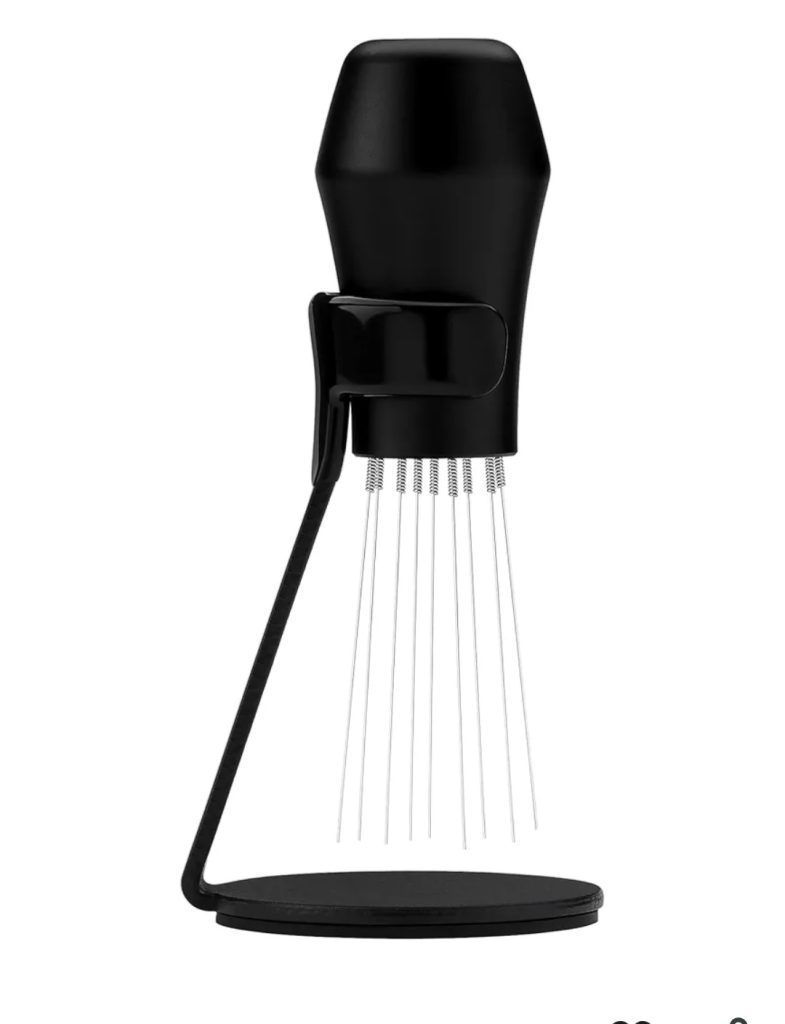
WDT Tools (Weiss Distribution Technique) tackle the clumping problem. Coffee grounds naturally stick together during grinding due to static and heat. These fine-needle tools break up clumps and distribute grounds evenly, preventing the channeling that leads to sour, under-extracted shots.
Distributors and Levelers address the consistency problem. They create an even, level surface before tamping, eliminating the guesswork and human error that can cause uneven extraction. Some can even replace traditional tampers entirely.
Together, these tools create a systematic approach to puck preparation that delivers more consistent results while making the entire process cleaner and more enjoyable.
Best Dosing Funnels: Keep Your Grounds Where They Belong
The MATOW 54mm dosing funnel transforms chaotic grinding sessions into controlled, mess-free workflows. Specifically designed for Breville machines like the Barista Express and Bambino Plus, this stainless steel funnel sits securely on your portafilter without requiring magnets.
Why we recommend it: Users consistently report dramatic reductions in counter mess and faster morning routines. The funnel’s height provides plenty of room for even the fastest grinders, and the smooth interior ensures grounds flow freely without sticking. At under $15, it pays for itself quickly in reduced coffee waste.
Best for: Breville owners who want to eliminate daily cleanup hassles and protect their precious coffee investment.
Best for 58mm Machines: Normcore Magnetic Dosing Funnel
The Normcore magnetic dosing funnel combines precision engineering with practical convenience. Strong magnets ensure secure attachment to any 58mm portafilter, while the aluminum construction provides durability without excessive weight.
Why we recommend it: The magnetic attachment eliminates the wobbling and shifting that plague cheaper funnels, especially when using WDT tools. The interior dimensions are perfectly sized to accommodate various dose sizes without interference. Professional baristas appreciate the consistent performance across different machines.
Best for: 58mm machine owners who want professional-grade reliability and seamless integration with other puck prep tools.
The BaristaSpace dosing funnel delivers essential functionality at an accessible price point. While it lacks the magnetic attachment of premium options, its precise fit and quality construction make it an excellent entry point for budget-conscious baristas.
Why we recommend it: This funnel proves you don’t need to spend a fortune to solve the mess problem. The food-grade stainless steel construction ensures durability, and the simple design means there’s little that can go wrong. It’s particularly popular among college students and first-time espresso machine owners.
Best for: Budget-conscious coffee enthusiasts who want to test dosing funnel benefits before investing in premium options.
The Normcore WDT V3 represents the current gold standard in distribution tools. Nine precisely spaced needles create optimal stirring patterns, while the magnetic base provides convenient storage and the ergonomic handle ensures comfortable use even during busy morning routines.
Why we recommend it: This tool consistently produces fluffy, evenly distributed coffee beds that extract more uniformly than hand-leveling alone. The 0.4mm needle thickness strikes the perfect balance between effectiveness and gentle handling. Users report noticeable improvements in shot taste and consistency within their first week of use.
Best for: Serious home baristas who want professional-level distribution results with convenient daily usability.
Best Premium Option: IKAPE Mantis WDT Distribution Tool
The WDT tool combines striking aesthetics with exceptional functionality. Its unique design features interchangeable needle configurations and a magnetic handle that stores conveniently on metal surfaces.
Why we recommend it: Beyond its Instagram-worthy looks, this tool delivers consistent performance that justifies its premium price. The ability to customize needle patterns lets advanced users optimize for different coffee types and grind settings. The build quality ensures this tool will serve faithfully for years.
Best for: Espresso enthusiasts who appreciate exceptional design and want maximum customization options for different brewing scenarios.
The Aieve WDT tool proves that effective distribution doesn’t require a premium price tag. Ten needles provide thorough stirring action, while the included stand keeps your workspace organized.
Why we recommend it: At under $10, this tool removes financial barriers to better espresso. While the plastic construction feels less premium than aluminum alternatives, it performs the essential function excellently. Many users start here and discover they don’t need to upgrade.
Best for: Beginners who want to experience WDT benefits without significant financial commitment, or backup tools for multi-machine setups.
Best Coffee Distributors: Level Up Your Tamping Game
Best Dual-Purpose: IKAPE 58mm Distributor & Tamper Combo
The IKAPE combo tool eliminates the need for separate distributors and tampers while ensuring consistent results every time. Adjustable depth settings accommodate different dose sizes, and the dual-head design streamlines your workflow.
Why we recommend it: This tool addresses two critical steps in one device, reducing counter clutter and workflow complexity. The distributor side creates perfectly level coffee beds, while the tamper side applies consistent pressure. Users report more uniform extractions and faster prep times.
Best for: Home baristas who want professional results with minimal tool investment and counter space usage.
Best for Breville: MATOW 53mm Distributor & Tamper
The MATOW 53mm combo tool specifically addresses the unique requirements of Breville’s 54mm portafilter system. Adjustable depth and dual functionality make it ideal for these popular home machines.
Why we recommend it: Breville machines require specific sizing that many generic tools don’t accommodate properly. This tool’s dimensions ensure proper fit and function with Barista Express, Barista Pro, and similar models. The build quality rivals much more expensive alternatives.
Best for: Breville machine owners who want proper-fitting distribution tools without paying premium prices for brand-specific accessories.
The Real Impact on Your Coffee
Understanding these tools’ benefits requires looking beyond the initial purchase price to consider their impact on your daily coffee experience and long-term satisfaction.
Consistency Improvements
Shot-to-shot variation decreases dramatically when using proper puck preparation tools. Traditional hand-leveling and tamping introduce human variables that these tools minimize or eliminate entirely.
Extraction evenness improves when coffee grounds are properly distributed and leveled. This translates to more balanced flavors, reduced channeling, and higher success rates when dialing in new coffees.
Workflow reliability increases when you can count on consistent results regardless of your skill level or morning alertness. These tools essentially provide insurance against human error during critical preparation steps.
Time and Frustration Savings
Reduced cleanup time from dosing funnels alone can save 2-3 minutes per brewing session. Over a year, this adds up to hours of saved time and significantly less kitchen mess.
Faster dial-in process when shots extract more consistently. You can focus on grind size and dose adjustments rather than fighting preparation inconsistencies.
Lower coffee waste from improved shot success rates means your expensive beans go further and taste better more often.
Skill Development Benefits
Learning acceleration occurs when tools remove variables that can mask technique improvements. You can focus on grind, dose, and timing rather than fighting preparation fundamentals.
Confidence building comes from consistently better results. Success breeds motivation to continue improving and experimenting with different coffees.
Professional habits develop naturally when your workflow mirrors commercial standards. This foundation supports continued skill growth.
Common Mistakes and How to Avoid Them
Even quality tools can disappoint when used incorrectly. Understanding proper technique ensures you get maximum benefit from your investment.
Dosing Funnel Errors
Over-filling the funnel can cause grounds to spill when removing it. Fill gradually and tap gently to settle grounds before removal.
Wrong size selection creates gaps that defeat the purpose. Measure your portafilter carefully—54mm machines need 54mm funnels, not close approximations.
Rough handling can damage magnetic attachments or bend thin metal walls. Treat funnels gently, especially when cleaning or storing.
WDT Technique Problems
Too aggressive stirring can compact grounds rather than fluffing them. Use gentle circular motions and let the needles do the work.
Insufficient depth leaves bottom layers unstirred, creating uneven density. Ensure needles reach the basket bottom without excessive force.
Wrong needle count affects effectiveness. Too few needles miss clumps; too many can over-work the grounds.
Distributor and Tamper Issues
Incorrect depth setting prevents proper contact with coffee or creates excessive compression. Adjust depth for your typical dose size and basket depth.
Uneven spinning creates ridges instead of smooth surfaces. Practice consistent rotation speed and pressure for optimal results.
Skipping calibration when changing dose sizes leads to poor distribution. Re-adjust tools when changing your coffee recipe.
Making Your Investment Decisions
Choosing the right combination of tools requires honest assessment of your current pain points and future espresso ambitions.
Start with Biggest Problems
If mess is your primary concern, begin with a quality dosing funnel. The immediate improvement in cleanliness and efficiency provides instant gratification and motivation to continue upgrading.
If consistency issues frustrate you, prioritize a WDT tool. The improvement in shot quality often surprises newcomers and demonstrates the value of proper puck preparation.
If you struggle with tamping technique, consider a distributor/tamper combo that removes skill variables while teaching proper workflow.
Consider Your Machine Type
Breville owners benefit most from 54mm-specific tools that properly fit their unique portafilter dimensions. Generic 58mm tools often create gaps that reduce effectiveness.
Traditional machine users with 58mm portafilters have the widest selection of compatible tools and can focus purely on features and quality rather than sizing constraints.
Manual machine enthusiasts often appreciate the precision control these tools provide, as they complement the hands-on nature of lever espresso preparation.
Budget Allocation Strategy
$30-50 budget: Start with a quality dosing funnel and basic WDT tool. This combination addresses the most common problems affordably.
$75-100 budget: Add a good distributor/tamper combo to create a complete puck preparation system that rivals commercial standards.
$150+ budget: Invest in premium versions of each tool for maximum durability, functionality, and aesthetic appeal.
Quick Comparison: Essential Puck Prep Tools
Tool Type
Primary Function
Price Range
Impact Level
Learning Curve
Dosing Funnel
Eliminate mess & waste
$12-$35
Immediate
None
WDT Tool
Break clumps & distribute
$9-$80
High
Minimal
Distributor/Leveler
Create even coffee bed
$25-$60
Medium
Low
Combo Tools
Multiple functions
$30-$75
High
Medium
Premium Sets
Complete workflow
$100-$200
Maximum
Low
Best For
Recommended Combo
Total Investment
Key Benefits
Beginners
Basic funnel + budget WDT
$25-$40
Clean workflow, better shots
Breville Users
54mm funnel + distributor combo
$45-$70
Proper fit, consistent prep
Enthusiasts
Premium funnel + WDT + distributor
$80-$150
Professional results
Minimalists
Dual-purpose distributor/tamper
$35-$60
Single tool solution
Bottom Line: Start with a dosing funnel to solve the mess problem, add a WDT tool for better distribution, then consider distributors for workflow optimization.
Your Next Steps
The journey from chaotic coffee preparation to smooth, professional workflows doesn’t require buying everything at once. Start with the tool that addresses your biggest current frustration, then build your kit as you experience the benefits.
Most importantly, remember that these tools work best as part of a systematic approach to espresso preparation. Each one solves specific problems, but the real magic happens when they work together to create consistency you can count on.
Begin with proper measurement and dosing, use your funnel to contain the mess, apply WDT technique to distribute evenly, level with a distributor if needed, tamp consistently, and extract with confidence. When each step builds on the previous one, your espresso quality improves dramatically while your stress levels drop.
The goal isn’t to own the most expensive tools—it’s to create a workflow that produces coffee you’re excited to drink every single day. These tools simply make that goal much more achievable, one well-prepared puck at a time.
You’ve invested in a quality espresso machine and you’re pulling decent shots. But something’s missing. Your workflow feels clunky, your counters look chaotic, and despite your best efforts, your coffee still doesn’t quite match what you get at your favorite café.
The gap between good home espresso and great café-quality coffee often comes down to the supporting cast—those essential accessories that professional baristas take for granted. While your espresso machine is the star of the show, the right accessories transform your kitchen into a functional coffee workspace that produces consistently exceptional results.
The challenge isn’t finding accessories (there are hundreds available), but identifying which ones actually solve real problems versus those that just look impressive on your counter. After years of testing gear and talking to home baristas, we’ve identified the accessories that genuinely elevate your coffee game without breaking the bank.
The Foundation: Must-Have Essentials
These accessories address fundamental workflow problems that every home barista encounters. Start here for immediate, noticeable improvements to your daily coffee routine.
Digital Coffee Scale: Your Most Important Investment
A precision scale transforms espresso from guesswork into a repeatable craft. Without accurate measurements, you’re essentially flying blind with every shot.
Maestri House Coffee Scale with Timer 4.6/5 Stars View on Amazon
The Maestri House scale combines precision weighing with automatic timing functionality. Its 0.1g accuracy ensures consistent dosing, while the built-in timer starts automatically when it detects weight changes—perfect for timing espresso extractions.
Why we recommend it: This scale eliminates the two biggest variables in espresso preparation: dose weight and extraction time. The rechargeable battery lasts weeks between charges, and the water-resistant design handles steamy espresso environments. The compact size fits most drip trays.
Best for: Anyone serious about improving shot consistency and learning proper espresso ratios.
Milk Frothing Pitcher: Essential for Café-Style Drinks
If you make cappuccinos, lattes, or any milk-based drinks, a quality milk pitcher is non-negotiable for creating proper microfoam.
The Normcore pitcher features precision-engineered spout geometry that makes latte art achievable even for beginners. The handle design provides excellent control during pouring, and the stainless steel construction ensures durability.
Why we recommend it: The spout design is specifically optimized for both beginner-friendly milk pouring and advanced latte art techniques. The 20oz capacity is perfect for making multiple drinks or larger servings without being unwieldy for single drinks.
Best for: Home baristas who want to master milk-based drinks and latte art without fighting their equipment.
Knock Box: Keep Your Workspace Clean
A knock box provides a dedicated place for spent espresso pucks, keeping your sink and counter clean while streamlining your workflow.
Apexstone Stainless Steel Knock Box 4.5/5 Stars View on Amazon
The Apexstone knock box features durable stainless steel construction with a rubber-wrapped knock bar that protects your portafilter. The compact size fits most counters while providing adequate capacity for daily use.
Why we recommend it: This knock box strikes the perfect balance between size, durability, and price. The stainless steel construction is dishwasher safe, and the rubber wrap prevents damage to expensive portafilters. Users report it lasting years with daily use.
Best for: Anyone who makes multiple espresso drinks daily and wants to keep their workspace organized and clean.
Workflow Enhancers: Level Up Your Process
These accessories address common frustrations and inefficiencies in home espresso preparation, making your routine smoother and more enjoyable.
Precision Portafilter Baskets: Consistency You Can Taste
The baskets that come with most home machines have inconsistent hole sizes that can cause uneven extraction. Precision baskets solve this problem.
IMS baskets feature laser-cut holes with perfect uniformity and geometry. The 18g capacity works well with most home espresso recipes, and the ridgeless design prevents coffee buildup.
Why we recommend it: Users report noticeable improvements in shot taste and consistency when switching to precision baskets. The enhanced water flow creates more even extraction, reducing sourness and bitterness while improving clarity of flavors.
Best for: Home baristas who want to maximize their machine’s potential and taste the difference quality equipment makes.
Tamping Mat: Protect Your Surfaces
A dedicated tamping mat protects counters from damage while providing a stable, non-slip surface for consistent tamping technique.
Watchget Silicone Tamping Mat 4.4/5 Stars View on Amazon
The Watchget mat features food-grade silicone construction with a raised portafilter rest and corner design that fits against counter edges. The 8×6 inch size provides ample workspace.
Why we recommend it: The corner design allows you to brace the mat against your counter edge for stable tamping. The silicone material grips your counter surface and absorbs tamping force while protecting expensive countertops from scratches and stains.
Best for: Anyone who wants to protect their counters and establish a dedicated workspace for espresso preparation.
Advanced Accessories: For the Dedicated Enthusiast
These accessories provide incremental improvements for serious home baristas who want to optimize every aspect of their espresso preparation.
Bottomless Portafilter: Visual Feedback for Better Shots
A bottomless portafilter lets you see extraction in real-time, helping identify and correct puck preparation issues.
This precision-machined portafilter features perfect fitment for most 58mm machines and comes with interchangeable baskets for different dose sizes.
Why we recommend it: Visual feedback from bottomless extraction helps you identify channeling, uneven distribution, and tamping issues immediately. This accelerates skill development and helps you troubleshoot problem shots effectively.
Best for: Intermediate to advanced home baristas who want to improve their puck preparation skills and shot consistency.
Puck Screen: Protect Your Machine
A puck screen sits on top of your coffee grounds, protecting the machine’s shower screen while promoting even water distribution.
The Ikape puck screens feature precise mesh construction that filters water while protecting internal components. The set includes multiple screens for different basket sizes.
Why we recommend it: Puck screens keep your machine’s shower screen cleaner, reduce maintenance frequency, and help create firmer spent pucks that are easier to knock out. Many users notice improved shot consistency and easier cleanup.
Best for: Baristas who want to reduce machine maintenance while potentially improving extraction consistency.
Dosing Cups: Precision Workflow
Dosing cups allow precise measurement and clean transfer of ground coffee, reducing mess and improving workflow efficiency.
These cups feature pour spouts designed for clean transfer into portafilters and graduations for accurate measurement. The set includes multiple sizes for different dose weights.
Why we recommend it: Dosing cups allow you to weigh beans, grind into the cup, then transfer cleanly to your portafilter. This workflow reduces mess and enables single-dosing with retention-prone grinders.
Best for: Home baristas who want a cleaner, more controlled workflow or need to single-dose with hoppered grinders.
Specialty Tools: Solve Specific Problems
These accessories address particular challenges that some home baristas encounter based on their equipment or preferences.
Steam Wand Thermometer: Perfect Milk Temperature
If your machine lacks temperature control for steaming, an external thermometer ensures optimal milk temperature every time.
This clip-on thermometer reads temperatures from 0-220°F with clear markings for optimal steaming zones. The stainless steel probe is dishwasher safe.
Why we recommend it: Properly heated milk (140-150°F) tastes sweet and creamy, while overheated milk becomes thin and bitter. This thermometer takes the guesswork out of milk steaming for machines without built-in temperature control.
Best for: Users of entry-level machines or anyone who struggles with consistent milk steaming temperature.
Shot Mirror: See Your Extraction
A shot mirror placed under your portafilter lets you monitor extraction without contorting yourself to see underneath.
This angled mirror reflects your portafilter’s output, making it easy to monitor flow rate, color changes, and extraction timing from a comfortable position.
Why we recommend it: Visual monitoring helps you identify when to stop extraction based on flow characteristics rather than just timing. This is particularly valuable when dialing in new coffees or troubleshooting problematic shots.
Best for: Serious home baristas who want to master the visual aspects of espresso extraction.
Building Your Accessory Kit: A Strategic Approach
Rather than buying everything at once, build your accessory collection strategically based on your current needs and skill level.
Starter Kit ($75-100)
Digital scale with timer
Basic tamping mat
Simple knock box
Quality milk pitcher (if you make milk drinks)
This foundation addresses the biggest workflow problems and provides immediate improvements to consistency and cleanliness.
Intermediate Kit ($150-250)
Add precision baskets, cleaning supplies, and workflow enhancers:
Precision portafilter basket
Comprehensive cleaning kit
Dosing cups or funnel system
Upgraded tamper if needed
These additions improve consistency and protect your equipment investment.
Advanced Kit ($300-500)
For serious enthusiasts ready to optimize every variable:
Bottomless portafilter
Puck screens
Specialty tools for your specific needs
Premium versions of basic accessories
This level focuses on incremental improvements and diagnostic tools for serious skill development.
Maintenance and Care: Protecting Your Investment
Quality accessories require proper care to maintain their performance and longevity.
Daily Maintenance
Rinse and dry all accessories after use. Coffee oils and milk residue can build up quickly and affect performance.
Store properly to prevent damage. Delicate items like precision scales should be protected from moisture and impacts.
Check for wear regularly. Replace worn components like basket screens or tamper surfaces before they affect coffee quality.
Weekly Deep Cleaning
Thorough washing of all accessories prevents buildup that can harbor bacteria or create off-flavors.
Inspect for damage including cracks in handles, worn surfaces, or loose connections that could affect performance.
Calibrate scales monthly to ensure continued accuracy, especially if you notice inconsistent readings.
Common Accessory Mistakes to Avoid
Even quality accessories can disappoint when used incorrectly or purchased for the wrong reasons.
Size Compatibility Issues
Measure carefully before purchasing. A 54mm tamper won’t work properly with a 58mm machine, and the wrong size basket can ruin extraction.
Check clearances for items like scales and pitchers. Ensure accessories fit your machine’s dimensions and drip tray configuration.
Quality vs. Price Confusion
Expensive doesn’t always mean better for your specific needs. A $200 tamper won’t improve your coffee if technique is the real issue.
Cheap can be costly when poor quality accessories break quickly or perform inadequately. Research thoroughly before purchasing budget alternatives.
Workflow Incompatibility
Consider your routine before adding accessories. Some tools that work well for leisurely weekend brewing may be impractical for busy morning routines.
Start simple and add complexity gradually. Jumping to advanced accessories without mastering basics often creates more problems than solutions.
Quick Reference: Essential Accessories by Priority
Priority Level
Accessory
Problem Solved
Price Range
Critical
Digital scale
Inconsistent dosing
$30-60
Critical
Milk pitcher
Poor milk texture
$25-50
High
Knock box
Messy workspace
$20-40
High
Tamping mat
Counter protection
$15-30
Medium
Precision basket
Uneven extraction
$25-45
Medium
Cleaning kit
Machine maintenance
$35-60
Low
Bottomless portafilter
Extraction visibility
$40-80
Low
Puck screen
Machine protection
$15-25
Machine Type
Recommended First Purchase
Reasoning
Entry-Level
Scale + Milk Pitcher
Address basic consistency needs
Mid-Range
Scale + Precision Basket
Maximize machine potential
High-End
Complete starter kit
Match accessories to machine quality
Integrated Grinder
Scale + Workflow tools
Focus on post-grind improvements
Bottom Line: Start with a quality scale and milk pitcher, add workflow tools as needed, then consider precision upgrades as your skills develop.
Your Upgrade Path Forward
Building an effective accessory collection is about solving actual problems in your coffee routine, not accumulating gear for its own sake. Start with the essentials that address your biggest frustrations, then expand methodically as your skills and needs evolve.
Remember that the best accessory is often the one that removes a daily annoyance or helps you achieve more consistent results. A $30 scale that enables proper dosing will improve your coffee more than a $300 tamper if you’re currently eyeballing measurements.
Focus on accessories that support good technique rather than trying to replace it. The goal is creating a workflow that makes great coffee achievable and enjoyable every single day, one well-chosen accessory at a time.
You’ve watched the line form at your office’s aging drip coffee maker every morning. The inevitable burnt pot by 2 PM. The passive-aggressive notes about who forgot to clean up. Sound familiar?
Commercial pod machines promise to solve these workplace coffee woes with the press of a button. But with upfront costs ranging from $300 to $3,000 and ongoing pod expenses that can add up quickly, the question isn’t just about convenience—it’s about whether these machines deliver real value for your business.
The truth is more nuanced than the marketing materials suggest. Some offices thrive with pod systems while others find them surprisingly limiting. The key lies in understanding what these machines actually do well and where they fall short.
Understanding Commercial Pod Systems
Commercial pod machines operate on a fundamentally different principle than traditional coffee makers. Instead of brewing large batches that sit and deteriorate, they deliver individual servings on demand using pre-portioned, sealed capsules.
Single-Serve Precision means each cup is brewed fresh with consistent water temperature, pressure, and timing. There’s no guesswork about ratios or brewing time, and no risk of someone making coffee too weak or too strong for the next person.
Sealed Freshness protects coffee from air, moisture, and light until the moment of brewing. Quality pods maintain their flavor for months, eliminating the stale coffee problem that plagues traditional office setups.
Zero Maintenance Brewing removes the human element from coffee preparation. No grinding, measuring, tamping, or timing required. Users simply insert a pod and press a button.
This approach works particularly well in environments where coffee quality matters but barista skills don’t exist. The system essentially provides a buffer between user inexperience and consistent results.
Our Top Commercial Pod Machine Picks
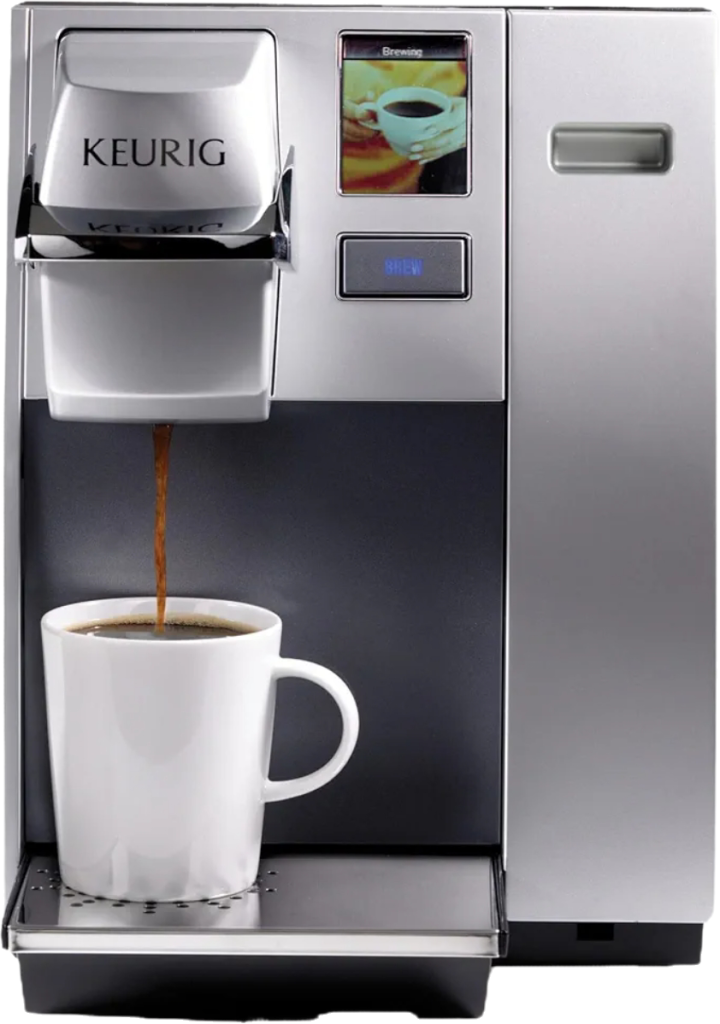
Best Overall: Keurig K-1500 Commercial Coffee Maker
The Keurig K-1500 strikes the ideal balance between commercial durability and user-friendly operation. Built specifically for small to medium businesses, it features Quiet Brew Technology that won’t disrupt office conversations and an extra-large 96-ounce water reservoir that minimizes refilling.
Why we recommend it: This machine handles 25+ employees using it all day without breaking down. The four cup size options (6, 8, 10, and 12 oz) accommodate different preferences, and the STRONG button delivers bolder flavors for serious coffee drinkers. Users consistently report reliable performance even after years of heavy use.
Best for: Offices with 10-50 employees who want reliable, consistent coffee without the complexity of traditional brewing.
The K155 Office Pro delivers commercial-grade performance with premium features. Its touchscreen interface provides intuitive operation, while the drain-and-store capability makes it perfect for seasonal offices or businesses that need to relocate equipment.
Why we recommend it: This machine heats up to 198°F, significantly hotter than most home models, ensuring proper extraction and satisfying coffee strength. The programmable settings allow customization for different user groups, and the commercial construction handles continuous daily use without deterioration.
Best for: Larger offices or businesses that want premium features and maximum durability from their coffee investment.
Best Compact Option: Keurig K150P Commercial System
The K150P offers full commercial features in a smaller footprint. Its interactive touch-screen supports multiple languages, and the 90-ounce reservoir provides ample capacity for smaller teams while remaining compact enough for tight break room spaces.
Why we recommend it: This machine can be plumbed directly into water lines or used as a pour-over system, providing installation flexibility. The full-color display guides users through operation, reducing confusion and maintenance calls.
Best for: Small offices, dental practices, or businesses with limited counter space that still want commercial-grade reliability.
The Real Cost Analysis
Understanding the true cost of commercial pod systems requires looking beyond the initial machine price. The numbers tell a compelling story about long-term value.
Initial Investment Breakdown
Machine costs range from $300 for basic commercial models to $3,000 for high-volume systems. Most small to medium offices find sweet spot machines in the $500-800 range that balance features with budget constraints.
Installation expenses vary significantly. Basic countertop models require only electrical connection, while plumbed systems may need professional installation costing $200-500 depending on your facility’s infrastructure.
Setup accessories include pod storage systems, cup dispensers, and cleaning supplies. Budget an additional $100-200 for a complete setup that looks professional and functions efficiently.
Ongoing Operating Costs
Pod expenses represent the largest ongoing cost factor. Quality K-Cups typically cost $0.50-$0.75 per serving, while premium pods can reach $1.00 or more. For an office brewing 50 cups daily, expect monthly pod costs of $500-750.
Maintenance requirements remain minimal compared to traditional systems. Commercial pod machines need descaling every 2-3 months and occasional deep cleaning, typically costing $20-40 per service cycle.
Utility consumption stays reasonable due to on-demand heating. Most commercial pod machines use similar electricity to a standard microwave when brewing and minimal power during standby.
Comparison with Alternatives
Traditional drip systems appear cheaper initially but hidden costs accumulate quickly. Coffee waste, cleaning time, and inconsistent quality create expenses that many businesses overlook.
Professional espresso setups deliver superior coffee quality but require skilled operators and significant maintenance. The learning curve alone can cost hundreds of hours in lost productivity.
Coffee service contracts eliminate machine ownership but typically cost 20-30% more per cup over time while locking businesses into specific suppliers and limited variety choices.
Workplace Productivity Impact
The productivity implications of commercial pod machines extend far beyond simple coffee brewing. The effects ripple through office culture in ways that many decision-makers don’t initially consider.
Time Efficiency Gains
Eliminated brewing delays save significant time daily. Traditional office coffee requires someone to start a pot, wait for brewing, and often results in empty pots during peak demand periods. Pod systems brew individual cups in 30-60 seconds with no waiting for batches.
Reduced cleanup responsibilities free employees from coffee-related chores. No more scrubbing pots, replacing filters, or dealing with coffee grounds. Users simply throw away used pods and occasionally refill water reservoirs.
Consistent availability means coffee becomes a reliable resource rather than a variable one. Employees can count on getting coffee when they need it, eliminating the productivity hit of leaving the building for coffee runs.
Quality and Satisfaction Factors
Predictable results eliminate the coffee lottery that exists in many offices. No more wondering if today’s batch will be too weak, too strong, or burnt. Each cup delivers identical quality regardless of who made it or when.
Individual preferences become possible with pod variety. Team members can choose different roasts, flavors, or caffeine levels without affecting others. This personalization often increases overall satisfaction with the office coffee program.
Professional presentation improves the office environment for employees and visitors. A clean, modern pod system creates a better impression than traditional setups that often look messy or outdated.
Common Challenges and Limitations
Despite their advantages, commercial pod machines aren’t perfect solutions for every situation. Understanding these limitations helps set realistic expectations and avoid disappointment.
Environmental Considerations
Pod waste creates environmental impact that concerns many businesses. Even recyclable pods require proper disposal systems, and not all employees consistently use recycling programs.
Packaging volume generates more waste than traditional brewing methods. A busy office might dispose of 200+ pods daily, creating noticeable waste stream increases.
Cost per cup environmental impact extends beyond waste to resource consumption. The manufacturing and shipping of individual pods uses more resources per serving than bulk coffee purchases.
Operational Limitations
Flavor restrictions limit customization compared to fresh bean systems. While pod variety has expanded dramatically, you’re still constrained by what manufacturers offer rather than choosing any coffee you prefer.
Dependence on suppliers creates vulnerability to supply chain disruptions or price changes. If your preferred pods become unavailable or expensive, switching can disrupt office routines.
Machine reliability becomes critical when it’s your only coffee source. A broken pod machine affects everyone immediately, while traditional systems often have backup options or simpler repairs.
User Experience Issues
Learning curves exist even for simple systems. New employees need training on proper operation, and different machines have different interfaces that can confuse occasional users.
Maintenance responsibility still requires someone to take ownership. Water refilling, pod restocking, and basic cleaning don’t happen automatically.
Peak demand challenges can overwhelm even commercial machines during busy periods. Morning rush or post-meeting coffee breaks can create queues and frustration.
Making the Right Decision for Your Business
Choosing whether to invest in commercial pod machines requires honest assessment of your specific situation rather than general industry trends.
Team Size and Usage Patterns
Small teams (under 15 people) often find pod systems perfect. The convenience outweighs cost concerns, and individual preferences become manageable with reasonable pod variety.
Medium offices (15-50 people) represent the sweet spot for commercial pod machines. Usage volume justifies commercial-grade equipment while remaining manageable for maintenance and supply management.
Large organizations (50+ people) may find pod systems expensive per serving and should consider hybrid approaches or multiple smaller machines rather than single large units.
Budget and Value Priorities
Cost-sensitive businesses should calculate total cost per cup including machine depreciation, pods, and maintenance. Sometimes traditional systems or coffee services provide better value despite convenience trade-offs.
Quality-focused offices may find pod systems limiting if coffee plays an important role in company culture or client relationships. The convenience might not compensate for reduced coffee quality compared to fresh-bean systems.
Convenience-prioritizing environments where time and simplicity matter most often find pod systems deliver excellent value despite higher per-cup costs.
Infrastructure and Space Constraints
Limited counter space makes compact pod machines attractive compared to traditional setups requiring coffee makers, grinders, and supply storage.
Minimal kitchen facilities suit pod systems perfectly since they require only electrical connection and basic water access for refilling.
Professional appearance requirements favor modern pod machines over traditional coffee stations that can look cluttered or institutional.
Quick Comparison: Pod vs. Traditional vs. Service
Factor
Commercial Pod Machines
Traditional Office Coffee
Coffee Service
Initial Cost
$500-$800
$100-$300
$0 upfront
Cost Per Cup
$0.50-$0.75
$0.15-$0.25
$0.60-$0.90
Setup Time
10 minutes
30 minutes
Professional install
Daily Maintenance
Minimal (refill water)
Moderate (clean, prep)
None
Coffee Quality
Consistent, good
Variable
Variable
Variety Options
50+ pod types
Unlimited beans
Limited menu
Peak Capacity
1 cup/minute
12 cups/batch
Service dependent
Space Required
Compact footprint
Larger setup
Machine + supplies
Staff Training
5 minutes
15 minutes
None needed
Flexibility
Pod-dependent
Complete control
Contract terms
Best For
10-50 person offices
Coffee enthusiasts
Hands-off preference
Bottom Line: Choose pods for consistency and convenience, traditional systems for cost and control, or service contracts for zero management responsibility.
Your Next Steps
Commercial pod machines work best when they match your office’s specific needs rather than trying to be everything to everyone. They excel at delivering consistent, convenient coffee to medium-sized teams that value time over cost optimization.
The investment makes sense when you calculate not just the per-cup cost but the value of eliminated hassles, improved consistency, and enhanced workplace satisfaction. For many businesses, the productivity gains and reduced coffee-related friction justify the premium over traditional brewing methods.
Start by honestly assessing your current coffee situation. If you’re dealing with complaints about quality, arguments about who cleans up, or productivity hits from coffee-related delays, commercial pod machines likely solve more problems than they create.
The key to success lies in choosing the right machine for your volume, training users properly, and establishing simple maintenance routines. When implemented thoughtfully, commercial pod systems transform office coffee from a daily challenge into a reliable workplace amenity that actually enhances rather than complicates your business operations.
There’s nothing worse than taking that first sip of your coffee only to find it’s already gone lukewarm, or reaching for your ice water to discover it’s become room temperature soup. Whether you’re powering through morning meetings, tackling outdoor adventures, or simply wanting your drinks to stay perfect throughout the day, the right insulated tumbler transforms your hydration experience from frustrating to flawless.
At HydroBrewLab, we’ve put hundreds of insulated tumblers through rigorous real-world testing because we know that marketing claims don’t always match kitchen counter reality. We test temperature retention over 12+ hour periods, evaluate lid designs under actual commuting conditions, and assess durability through months of daily use. The result? Data-driven recommendations that cut through the hype and focus on what actually keeps your drinks at the temperature you want them.
From budget-friendly options that deliver surprising performance to premium tumblers that justify their price tags, we’ve organized our expertise into comprehensive guides that make choosing the perfect insulated tumbler straightforward. Every recommendation is backed by hands-on testing, technical analysis, and community feedback from fellow coffee enthusiasts and hydration-focused individuals who demand real-world performance.
Disclosure: As an Amazon Associate, HydroBrewLab earns from qualifying purchases. We only recommend products we’ve thoroughly tested and believe provide genuine value to our community. Your support helps us continue providing unbiased, data-driven reviews.
Whether you’re looking to upgrade your morning coffee routine or find the perfect all-day hydration companion, our insulated tumbler guides help you brew smarter, hydrate better, and master the perfect sip every time.
Tumbler Buying Guides
Navigate the world of insulated tumblers with confidence using our comprehensive buying guides. We break down the essential factors that matter most—from insulation technology and material quality to lid designs and capacity options. These guides help you identify which features align with your specific needs, whether you’re prioritizing heat retention for coffee, leak-proof performance for commuting, or maximum capacity for all-day hydration.
What You’ll Find: Feature comparison frameworks, budget vs. premium analysis, and step-by-step guidance for choosing insulated tumblers that match your lifestyle and preferences.
Get the complete picture with our head-to-head insulated tumbler comparisons that go beyond surface-level specs. We test leading brands like YETI, Hydro Flask, Stanley, and BrüMate under identical conditions, measuring actual temperature retention, evaluating lid performance, and assessing long-term durability. These ultimate guides provide the detailed analysis you need to make informed decisions between top-tier options.
What You’ll Find: Side-by-side temperature testing results, detailed feature breakdowns, and honest pros and cons assessments for every major insulated tumbler brand and model.
Must-Have Tumbler Accessories – Straws, Lids & More (2025 Guide)
Maximize your insulated tumbler’s performance with the right accessories. From leak-proof lid upgrades and ergonomic handles to replacement straws and cleaning tools, the right add-ons can transform a good tumbler into the perfect hydration companion. Our 2025 accessory guide covers compatibility, performance testing, and value analysis for every type of tumbler enhancement available.
What You’ll Find: Compatibility matrices for popular tumbler brands, performance testing of aftermarket lids and straws, and recommendations for accessories that genuinely improve your daily experience.
Cleaning & Use: A Practical Guide to Insulated Tumblers
Keep your insulated tumbler performing at peak levels with proper care and maintenance techniques. Even the best insulated tumblers can develop odors, stains, or reduced performance without proper cleaning protocols. Our practical guide covers daily maintenance, deep cleaning methods, and troubleshooting common issues to ensure your investment stays fresh and functional for years.
What You’ll Find: Step-by-step cleaning protocols, stain removal techniques, troubleshooting guides for common problems, and maintenance schedules that preserve insulation performance and hygiene.
The History and Science of the Vacuum Insulated Tumbler
Understanding the technology behind your insulated tumbler helps you make smarter buying decisions and appreciate the engineering that keeps your drinks temperature-perfect. From the invention of vacuum insulation to modern double-wall construction techniques, this guide explores how insulated tumblers work, why certain designs perform better than others, and what innovations are shaping the future of temperature retention technology.
What You’ll Find: The fascinating evolution from early vacuum flasks to modern insulated tumblers, scientific explanations of heat transfer principles, and insights into manufacturing processes that impact performance and durability.
You’ve been dreaming about perfect morning espresso, scrolling through gleaming machines online, imagining yourself as a home barista crafting café-quality shots. I get it—we’ve all been there, convinced that the right machine will transform our coffee routine overnight.
Here’s what nobody tells you in those glossy product descriptions: buying your first espresso machine is just the beginning of a journey that’s more complex, more expensive, and more rewarding than you expect. Let me share the hard-earned insights that could save you months of frustration and hundreds of dollars in mistakes.
The goal isn’t to discourage you—it’s to set realistic expectations so you can actually succeed and enjoy the incredible coffee that’s waiting on the other side of the learning curve.
Disclosure: As an Amazon Associate, HydroBrewLab earns from qualifying purchases. We only recommend products we’ve thoroughly tested and believe provide genuine value to our community. Your support helps us continue providing unbiased, data-driven reviews.
The Reality Check: What You’re Actually Signing Up For
It’s Not Just About the Machine
The biggest shock for new espresso enthusiasts? Discovering that a $400 espresso machine needs a $300 grinder to produce decent coffee. The machine gets the headlines, but the grinder does half the work—and cheap grinders absolutely sabotage your results.
The complete starter setup reality:
Espresso machine: $300-800 for entry-level quality
Dedicated grinder: $200-400 minimum for consistent results
Scale: $30-50 for proper dosing
Tamper: $30-80 for even extraction
Milk pitcher: $20-40 for steaming
Quality beans: $15-20/pound, and you’ll go through them faster than expected
That $400 machine quickly becomes a $1,000+ investment before you pull your first decent shot.
The Learning Curve Is Steeper Than You Think
Week 1: Everything tastes terrible. You’ll question every decision and wonder if you got a defective machine.
Month 1: Occasional good shots mixed with frustrating failures. You’ll start understanding why variables matter but can’t control them consistently yet.
Month 3: Developing muscle memory and taste recognition. Still chasing that perfect shot, but enjoying the journey more.
Month 6+: Consistent quality with room for experimentation. The investment starts paying off in both taste and satisfaction.
Most people expect instant gratification but discover that espresso is part science, part art, and completely dependent on developing skills that take time to master.
The Hidden Costs That Nobody Mentions
Beyond the Initial Purchase
Premium bean consumption: You’ll drink more coffee and demand higher quality beans. Budget $50-80 monthly just for beans if you’re serious about good espresso.
Maintenance and replacement parts: Descaling solutions, water filters, group head screens, portafilter baskets—these small costs add up to $100-200 annually.
The upgrade itch: Once you taste what good espresso can be, you’ll inevitably want better equipment. Budget for at least one major upgrade within two years.
Accessories you didn’t know you needed: Distribution tools, bottomless portafilters, different basket sizes, cleaning tablets—each solving specific problems you’ll discover along the way.
The Grinder Investment Reality
This deserves special attention because it’s the most common mistake. A $50 blade grinder or even a $100 burr grinder designed for drip coffee will make consistent espresso nearly impossible.
The painful truth: you’ll get better espresso from a $200 machine with a $400 grinder than a $600 machine with a $100 grinder.
Common Beginner Mistakes (And How to Avoid Them)
Mistake #1: Focusing Only on Machine Features
The trap: Getting seduced by pressure gauges, PID controllers, and fancy displays while ignoring grinder quality and basic technique fundamentals.
The fix: Allocate your budget 50/50 between machine and grinder, then focus on mastering basics before worrying about advanced features.
Mistake #2: Expecting Instant Café Quality
The reality: Your local coffee shop has $5,000+ equipment operated by trained professionals. Your first shots won’t match their quality, and that’s completely normal.
The perspective: Focus on progress, not perfection. Document your journey—you’ll be amazed how much you improve in just a few months.
Mistake #3: Ignoring Water Quality
The oversight: Using tap water without considering mineral content, chlorine, or pH levels that dramatically affect extraction and machine longevity.
The solution: Start with filtered water and consider water testing if you’re in an area with very hard or very soft water. Water makes up 98% of your espresso.
Mistake #4: Buying Based on Aesthetics
The temptation: Choosing machines that look great on your counter but lack the functional features you’ll actually need for consistent results.
The wisdom: Prioritize thermal stability, build quality, and ease of maintenance over appearance. A beautiful machine that frustrates you daily isn’t worth it.
Mistake #5: Underestimating Counter Space and Storage
The surprise: Espresso setups expand. You’ll need space for the machine, grinder, scale, accessories, bean storage, and workflow area.
The planning: Measure your space and plan for the complete setup, not just the machine footprint.
Realistic Expectations vs. Marketing Promises
What Marketing Claims vs. Reality
“Café-quality espresso at home”
Marketing: Implies immediate professional results
Reality: Possible after months of practice with proper equipment and technique
“15-bar pressure for perfect extraction”
Marketing: More pressure equals better coffee
Reality: 9 bars is optimal; higher pressure often indicates pump quality issues
“Professional-grade performance”
Marketing: Suggests commercial-level capabilities
Reality: Entry-level machines lack thermal stability and build quality of true commercial equipment
“Easy one-touch operation”
Marketing: Effortless gourmet coffee
Reality: Good espresso requires active participation, monitoring, and adjustment
Setting Achievable Goals
First month: Focus on pulling shots that taste better than your old coffee routine, not perfect café shots.
Three months: Aim for consistency in your process, even if results vary. Developing muscle memory and routine matters more than perfect extraction.
Six months: Expect to produce espresso that rivals mid-tier coffee shops and satisfies your daily routine.
One year: With proper equipment and practice, you should consistently produce espresso that exceeds most commercial establishments.
The Decision Framework: Choosing Your First Machine
Thermal stability: Consistent temperature between shots matters more than peak temperature capability.
Steam wand design: Traditional wand gives better milk texturing control than automatic systems.
Portafilter quality: Commercial-style 58mm portafilters provide better heat retention and upgrade options.
Build quality indicators: Metal construction, replaceable parts availability, and established service networks.
Features You Can Live Without (Initially)
PID temperature control: Nice to have but not essential for good espresso with proper technique.
Pressure profiling: Advanced feature that matters after you’ve mastered basics.
Built-in grinder: Sounds convenient but usually compromises both functions for space savings.
Programmable shots: Manual control teaches you more and provides better results than preset programs.
The Success Strategy: Your First 90 Days
Week 1-2: Foundation Building
Master basic machine operation and safety
Establish cleaning and maintenance routine
Focus on consistent dosing and timing
Don’t worry about taste yet—focus on process
Week 3-6: Technique Development
Learn to recognize over and under-extraction
Practice milk steaming if you drink milk drinks
Start adjusting grind size systematically
Keep a simple log of what works
Week 7-12: Refinement Phase
Fine-tune grind, dose, and timing for consistency
Experiment with different beans and roast levels
Develop your palate for quality assessment
Start enjoying the process, not just chasing perfection
Beyond 90 Days: Mastery and Enjoyment
Focus on consistency over complexity
Explore advanced techniques gradually
Consider targeted upgrades based on experience
Share knowledge with other beginning enthusiasts
The Bottom Line: Is It Worth It?
The honest answer: only if you’re prepared for the commitment. Making great espresso at home requires time, money, and patience that goes well beyond buying a machine.
But here’s what makes it worthwhile: the satisfaction of crafting something exceptional with your own hands, the daily ritual that starts each morning right, and the long-term savings compared to café purchases once you develop consistency.
Most importantly, you’ll develop a deeper appreciation for coffee as both craft and science. That understanding enhances every cup you drink, whether at home or in the world’s best coffee shops.
The real question isn’t whether you can afford the initial investment—it’s whether you’ll enjoy the journey of learning something new that combines technical skill with sensory pleasure.
If you’re motivated by the process of improvement and don’t mind some initial frustration in service of long-term reward, espresso can become one of the most satisfying daily routines you’ll ever develop.
Ready to start your espresso journey? Begin with realistic budgeting for the complete setup, choose quality over features for your first machine, and remember that every expert started exactly where you are now. The learning curve is steep, but the view from the top is worth every challenging step along the way.
Remember: the best espresso machine is the one you’ll use consistently and maintain properly. Start with solid fundamentals, be patient with the process, and trust that competence leads to confidence—and eventually, to exceptional coffee.
You’re standing in the drinkware aisle, weighing a $15 plastic tumbler against a $35 stainless steel version, wondering if the price difference actually matters for your health. It’s a question we hear constantly: beyond the obvious durability differences, are there real safety concerns that should drive your decision?
Here’s what you need to know: the material choice for your daily tumbler affects more than just how long it lasts. From chemical leaching to temperature safety, the science behind these materials reveals some surprising truths that go well beyond marketing claims.
Let’s cut through the confusion and examine what really matters for your health, safety, and daily hydration routine.
Disclosure: As an Amazon Associate, HydroBrewLab earns from qualifying purchases. We only recommend products we’ve thoroughly tested and believe provide genuine value to our community. Your support helps us continue providing unbiased, data-driven reviews.
The Chemical Reality: What’s Actually in Your Tumbler
Plastic Tumblers: The Complex Chemistry
BPA concerns: While most modern plastic tumblers advertise “BPA-free,” this doesn’t mean chemical-free. Many BPA alternatives like BPS and BPF show similar hormonal disruption potential in emerging research.
Phthalate presence: These plasticizers make plastic flexible but can migrate into beverages, especially with heat exposure. They’re linked to endocrine disruption and reproductive health concerns.
Microplastic shedding: Even high-quality plastic tumblers release microscopic particles into beverages over time, particularly when exposed to hot liquids or aggressive washing.
The replacement chemical problem: Each time regulators ban a problematic plastic additive, manufacturers often substitute similar compounds that haven’t been thoroughly studied long-term.
Stainless Steel: The Cleaner Alternative
Material purity: Food-grade stainless steel (typically 18/8 or 304 grade) contains iron, chromium, and nickel in stable, non-reactive forms that don’t leach into beverages under normal use.
Coating considerations: Some stainless steel tumblers use plastic or powder coatings on interior surfaces—check for “uncoated interior” if you want pure stainless steel contact.
Welding and construction: Quality matters here—poorly constructed stainless steel can have rough welds or joints where bacteria can harbor, but well-made versions are essentially inert.
Heavy metal concerns: Legitimate worry about nickel leaching exists for people with severe nickel allergies, but testing shows minimal migration in properly manufactured food-grade stainless steel.
Temperature Safety: How Heat Changes Everything
Hot Beverage Risks
Plastic under heat stress: When you pour 180°F coffee into plastic, several concerning things happen:
Chemical migration increases dramatically—studies show 10x higher BPA leaching at coffee temperatures
Plastic degradation accelerates, creating new compounds that weren’t originally present
Microplastic release jumps significantly compared to room temperature use
Stainless steel advantages: Metal remains chemically stable across all beverage temperatures. No leaching concerns whether you’re drinking ice water or boiling tea.
Thermal shock reality: Plastic tumblers can crack or deform when exposed to extreme temperature changes, potentially creating bacteria harboring spots or sharp edges.
Cold Beverage Considerations
Condensation and hygiene: Plastic surfaces can develop microscopic scratches that trap bacteria, especially problematic with sweet or acidic cold beverages that feed bacterial growth.
Temperature retention: Stainless steel’s superior thermal properties mean your cold drinks stay cold longer, reducing the time bacteria have to multiply in the temperature danger zone.
Freezing concerns: Both materials handle freezing, but plastic becomes more brittle and prone to cracking, while stainless steel remains stable.
Durability and Hygiene: The Long-Term Health Picture
Surface Integrity Over Time
Plastic degradation patterns: Even BPA-free plastics develop micro-scratches, cloudiness, and surface degradation that creates ideal bacterial breeding grounds you can’t easily clean or see.
Odor and taste retention: Plastic’s porous nature means it absorbs and retains flavors, oils, and odors—that coffee taste lingering in your water isn’t just annoying, it’s a sign of contamination retention.
Stainless steel resilience: Properly maintained stainless steel maintains its smooth, non-porous surface indefinitely, providing no hiding spots for bacteria or flavor retention.
Cleaning and Sanitization Reality
Plastic limitations: You can’t use hot water, aggressive detergents, or sanitizing solutions without risking chemical leaching or material degradation. This limits your ability to thoroughly sanitize.
Dishwasher concerns: High-temperature dishwasher cycles can accelerate chemical leaching from plastic while being perfectly safe for stainless steel.
Deep cleaning capability: Stainless steel handles bleach solutions, boiling water, and aggressive cleaning when needed for thorough sanitization—options you don’t have with plastic.
Real-World Usage Scenarios: Making the Right Choice
Daily Office Use
Plastic pros: Lightweight for commuting, won’t dent if dropped, typically more affordable for replacement if lost.
Plastic cons: Chemical leaching from hot beverages, difficulty achieving thorough cleaning in office kitchens, faster replacement cycle due to wear.
Stainless steel advantage: Long-term durability, complete cleanability, no concerns about beverage temperature affecting safety.
Family and Children’s Use
Plastic considerations: Lighter weight for small hands, but children are more vulnerable to chemical exposure and more likely to use hot beverages inappropriately.
Safety perspective: Stainless steel eliminates chemical exposure concerns but requires teaching proper handling due to potential for denting or thermal conductivity.
Hygiene factors: Kids are messy—stainless steel’s superior cleanability becomes crucial for maintaining sanitary conditions.
Athletic and Outdoor Use
Durability demands: Stainless steel handles drops, impacts, and extreme temperatures without compromising safety or functionality.
Hydration safety: During intense exercise, avoiding any potential chemical exposure becomes more important as your body processes higher fluid volumes.
Temperature performance: Whether you need ice-cold hydration or hot recovery drinks, stainless steel maintains beverage temperature and safety.
The Financial Health Equation
Initial Investment vs. Long-Term Cost
Plastic tumbler lifecycle: Typically 6-18 months before replacement needed due to wear, odor retention, or visible degradation.
Stainless steel longevity: Quality stainless steel tumblers often last 5-10+ years with proper care, making the higher upfront cost economically sensible.
Health cost considerations: While difficult to quantify, reducing daily chemical exposure through better material choices represents genuine long-term health investment.
Quality Variations Within Categories
Not all plastic is equal: High-end Tritan plastic performs better than cheap alternatives, but still faces fundamental chemical migration issues with hot beverages.
Stainless steel grades matter: 18/8 food-grade stainless steel significantly outperforms cheaper grades in both safety and durability.
Construction quality impact: Well-designed tumblers in either material perform better than poorly made alternatives, but the safety ceiling is higher with stainless steel.
Making Your Decision: The Practical Framework
Choose Plastic When:
Weight is absolutely critical (hiking, cycling)
Budget constraints are severe
You only drink cold beverages
Replacement frequency isn’t a concern
Choose Stainless Steel When:
You regularly drink hot beverages
Long-term durability matters
You want maximum cleanability
Chemical exposure concerns exist
You value long-term cost efficiency
The Hybrid Approach
Many households benefit from having both: lightweight plastic for specific activities and stainless steel for daily use. This gives you options while prioritizing safety for your primary hydration routine.
Maintenance Realities: Keeping Either Choice Safe
Plastic Tumbler Best Practices
Never use with beverages over 140°F
Replace every 6-12 months regardless of appearance
Hand wash with lukewarm water and mild soap
Air dry completely to prevent bacterial growth
Inspect regularly for scratches or cloudiness
Stainless Steel Care
Use any cleaning method appropriate for the situation
Check rubber seals and gaskets separately for wear
Avoid abrasive materials that can scratch surfaces
Deep clean monthly with appropriate sanitizers
Expect decades of safe use with proper maintenance
The Bottom Line: Health vs. Convenience
The science is clear: stainless steel tumblers provide superior health and safety profiles, especially for hot beverages and long-term use. Plastic tumblers aren’t inherently dangerous when used appropriately, but they come with limitations that affect both safety and practicality.
Your daily hydration routine deserves a material choice that supports your health goals rather than potentially undermining them. While plastic tumblers serve specific purposes, stainless steel represents the safer long-term choice for most people’s primary drinkware needs.
The investment difference—typically $20-30—becomes negligible when spread over years of daily use, especially when you factor in replacement costs and the peace of mind that comes with eliminating unnecessary chemical exposure.
Make the call: If you drink hot beverages regularly, prioritize durability, or want the cleanest possible hydration experience, stainless steel is worth the investment. If weight and initial cost are your primary concerns and you stick to cold beverages, quality plastic can work—just plan for regular replacement.
Ready to upgrade your hydration game? Start with one high-quality stainless steel tumbler for your daily routine and experience the difference in taste, cleanliness, and peace of mind. Your body processes gallons of fluid through these containers each month—make sure the material choice supports your health rather than potentially compromising it.
You notice a musty smell when you brew your morning coffee, or maybe you’ve spotted some suspicious dark spots around your machine’s water reservoir. Before you panic or ignore it, let’s address what every coffee lover needs to know: mold in coffee machines is more common than you’d think, but it’s entirely manageable with the right approach.
Here’s the reality—coffee machines create the perfect storm for mold growth: warmth, moisture, and organic matter. But armed with the right knowledge, you can keep your brewing setup clean, safe, and producing great-tasting coffee for years to come.
Disclosure: As an Amazon Associate, HydroBrewLab earns from qualifying purchases. We only recommend products we’ve thoroughly tested and believe provide genuine value to our community. Your support helps us continue providing unbiased, data-driven reviews.
The Hidden Reality: Where Mold Actually Lives in Your Coffee Machine
The Obvious Suspects: What You Can See
Water reservoirs and tanks: That slimy film or black specks you occasionally notice? Classic mold territory. Stagnant water plus coffee oils create an ideal breeding ground.
Drip trays and water catch areas: These constantly damp zones collect coffee residue and provide perfect conditions for mold colonies to establish themselves.
External surfaces around steam wands: Espresso machines especially develop buildup where milk residue meets moisture—a mold paradise if left unchecked.
Filter baskets and portafilters: Coffee oils and moisture combine to create biofilm layers where mold thrives, often appearing as dark discoloration that looks like coffee staining.
The Stealth Zones: Hidden Mold Havens
Internal water lines and tubing: The most concerning area because it’s invisible and directly contacts your brewing water. Mold here affects every cup you make.
Heat exchangers and boilers: In espresso machines, these areas can harbor mold that’s impossible to see without disassembly, yet impacts your water quality significantly.
Pump housing and internal reservoirs: Single-serve machines like Keurig units have internal water paths that can develop mold colonies completely out of sight.
Grinder chambers: Built-in grinders create another mold risk when coffee oils and humidity combine with organic matter.
The concerning truth: by the time you see mold growth, the problem has likely been developing for weeks in areas you can’t easily inspect.
Health Risks: What You Need to Know
Immediate Symptoms to Watch For
Respiratory issues: Morning coughing, throat irritation, or increased allergy symptoms that coincide with your coffee routine often signal mold exposure.
Digestive concerns: Stomach upset, nausea, or digestive discomfort after drinking coffee can indicate mold contamination in your brewing system.
Taste and aroma changes: That “off” flavor or musty smell isn’t just bad coffee—it’s often your first warning sign of mold presence.
Who’s Most at Risk
Individuals with compromised immune systems: Mold exposure poses serious risks for anyone with autoimmune conditions, chronic illness, or respiratory sensitivities.
Allergy sufferers: Existing mold or dust allergies make coffee machine mold exposure particularly problematic, often triggering severe reactions.
Frequent coffee drinkers: The more exposure you have, the greater your risk of developing sensitivity or experiencing cumulative health effects.
Children and elderly household members: More vulnerable to mold-related health impacts and may show symptoms more quickly than healthy adults.
Here’s what’s important to understand: while coffee machine mold rarely causes severe acute illness in healthy individuals, chronic low-level exposure can contribute to ongoing health issues that are often difficult to trace back to the source.
Detection: Identifying Mold Before It Becomes a Problem
Visual Inspection Protocol
Monthly deep look: Remove all removable parts and inspect with good lighting. Look for dark spots, slimy films, or discoloration that wipes away easily.
Water quality check: Fresh water should be clear and odorless. Cloudy water, floating particles, or any smell indicates potential contamination.
Component examination: Pay special attention to rubber seals, gaskets, and any areas where different materials meet—these create perfect mold harboring spots.
Sensory Warning Signs
Smell test: Any musty, earthy, or “basement” odors coming from your machine indicate mold presence, even if you can’t see it.
Taste changes: Coffee that suddenly tastes flat, sour, or “off” despite using the same beans and technique often signals contamination.
Texture differences: If your coffee develops an unusual mouthfeel or leaves an aftertaste, investigate your machine’s cleanliness immediately.
The Flash Test: Quick Daily Checks
Every morning, take 30 seconds to:
Smell the water reservoir before filling
Check the drip tray for unusual buildup
Notice any changes in your coffee’s aroma or taste
Look for visible spots or films on accessible surfaces
Trust your instincts—if something seems off, investigate further rather than ignoring potential warning signs.
Safe Removal: Your Step-by-Step Action Plan
Immediate Response: First 24 Hours
Stop using the machine immediately: Don’t brew another cup until you’ve addressed the contamination. Continued use spreads mold throughout the internal systems.
Document the situation: Take photos of visible mold for warranty claims or professional service needs, and note any health symptoms you’ve experienced.
Ventilate the area: Mold remediation can release spores, so ensure good airflow in your kitchen during cleaning.
Deep Cleaning Protocol: The Complete Process
Step 1: Disassembly and Assessment
Remove all detachable parts: water reservoir, drip tray, filter baskets, portafilters
Inspect each component under good lighting
Separate heavily contaminated parts for intensive treatment
Step 2: Surface Mold Removal
Mix 1:1 white vinegar and water solution for visible mold
Use soft brushes or cloths—avoid abrasive materials that can damage surfaces
For stubborn growth, create a paste with baking soda and water
Never mix cleaning chemicals—stick to one method at a time
Step 3: Internal System Cleaning
Run 2-3 vinegar solution cycles through the brewing system
Follow with multiple fresh water flushes until no vinegar taste remains
For espresso machines, clean both brewing and steam circuits separately
Step 4: Component Sanitization
Soak removable parts in vinegar solution for 30 minutes
Scrub gently with soft brushes to remove biofilm
Rinse thoroughly and air dry completely before reassembly
Professional vs. DIY: Making the Call
Handle it yourself when:
Mold is limited to visible, accessible areas
You caught it early with minimal growth
Your machine is relatively simple with few internal components
Call professionals when:
Mold appears throughout multiple areas
You smell mold but can’t locate the source
The machine has complex internal systems you can’t access
Anyone in your household has serious mold sensitivities
Prevention: Your Long-Term Defense Strategy
Daily Habits That Make the Difference
Empty and rinse: Never leave water sitting in reservoirs overnight. Fresh water daily prevents most mold issues before they start.
Dry thoroughly: After brewing, leave all access doors open and removable parts out to air dry completely.
Clean immediately: Wipe down external surfaces and empty drip trays after each use—don’t let moisture accumulate.
Weekly Maintenance Routine
Deep clean removable parts: Hot soapy water wash for all detachable components, followed by thorough drying.
Internal rinse cycle: Run fresh water through the brewing system to flush any accumulated oils or particles.
Inspection and wipe-down: Check all visible surfaces and clean any buildup before it becomes established.
Monthly Prevention Protocol
Descaling schedule: Regular descaling prevents mineral buildup that creates perfect mold growing conditions.
Component rotation: If you have spare parts, rotate them to ensure everything gets thoroughly dried and cleaned.
Professional inspection: For expensive machines, annual professional cleaning catches problems you might miss.
Environmental Factors: Controlling Your Coffee Corner
Humidity Management
Kitchen ventilation: Use exhaust fans during and after brewing to reduce ambient moisture levels.
Storage considerations: Keep coffee machines away from dishwashers, sinks, and other high-humidity areas when possible.
Seasonal adjustments: Summer humidity requires more frequent cleaning and longer drying times between uses.
Temperature Control
Avoid extreme swings: Rapid temperature changes create condensation that promotes mold growth.
Proper storage: If storing machines long-term, ensure they’re completely dry and in climate-controlled environments.
The Bottom Line: Staying Ahead of the Problem
Coffee machine mold is preventable, manageable, and doesn’t have to compromise your brewing routine. The key is consistent attention to moisture control and regular maintenance rather than waiting for problems to develop.
Most mold issues result from simple neglect rather than complex problems—empty that water reservoir, dry those components, and trust your senses when something seems off. Your morning coffee ritual should energize you, not expose you to health risks.
Remember: a clean machine doesn’t just prevent mold—it brews better coffee. When you maintain your equipment properly, you’re protecting both your health and your daily coffee experience.
Start tomorrow: Empty your water reservoir tonight, inspect it in good light, and establish the daily habits that prevent problems before they start. Your future self (and your taste buds) will thank you.
Concerned about existing mold in your machine? Take photos, stop using it immediately, and start with the safe removal protocol above. When in doubt, prioritize your health over convenience—coffee tastes better when you’re not worried about what’s growing in your brewing system.
You’re standing in the water filter aisle, overwhelmed by options that range from $30 pitchers to $3,000 whole-house systems. Sound familiar? We’ve all been there, trying to decode which filtration approach actually makes sense for our specific situation.
Here’s the reality: the “best” water filter isn’t about the most expensive or most comprehensive system—it’s about matching your actual needs with real-world practicality. Let’s cut through the marketing hype and figure out what you actually need.
Disclosure: As an Amazon Associate, HydroBrewLab earns from qualifying purchases. We only recommend products we’ve thoroughly tested and believe provide genuine value to our community. Your support helps us continue providing unbiased, data-driven reviews.
Understanding the Big Three: Your Filtration Options
Pitcher Filters: The Gateway Solution
What they are: Countertop pitchers with built-in carbon filters that you fill manually.
Best for: Small households, renters, or anyone testing the waters of filtration (literally).
Pitcher filters excel at improving taste and reducing chlorine, but they’re limited in capacity and filtration scope. Think of them as your reliable daily driver—not flashy, but they get the job done for basic water improvement.
Real-world reality check: You’ll be refilling that pitcher 2-3 times daily for a family of four, and filter replacements every 2-3 months add up faster than you’d expect.
Under-Sink Filters: The Sweet Spot Solution
What they are: Multi-stage filtration systems installed directly to your kitchen cold water line.
Best for: Homeowners who want serious filtration without the whole-house investment.
These systems deliver restaurant-quality water right from your kitchen tap. They handle everything from chlorine and sediment to more serious contaminants like lead and pharmaceuticals, depending on the system you choose.
The installation truth: Most systems require basic plumbing skills or a handyman visit, but once installed, they’re surprisingly low-maintenance compared to pitcher constant refilling.
Whole House Systems: The Complete Coverage Solution
What they are: Point-of-entry systems that filter all water entering your home.
Best for: Homeowners with well water, serious water quality issues, or those who want filtered water at every tap.
When you turn on any faucet, shower, or appliance, you’re getting filtered water. It’s the ultimate solution for comprehensive water treatment, but it comes with corresponding complexity and cost.
The commitment factor: These systems require professional installation, regular maintenance, and represent a significant upfront investment—but they also add genuine value to your home.
The Real Decision Framework: Matching Your Life
Family Size and Usage Patterns
1-2 people, light usage: A quality pitcher filter often covers your drinking and coffee needs perfectly. You’re looking at around 1-2 gallons daily, which most pitchers handle comfortably.
3-4 people, moderate usage: This is where under-sink systems shine. When you’re going through 3-5 gallons of filtered water daily for drinking, cooking, and coffee, the convenience factor becomes crucial.
5+ people or heavy usage: Whole house systems start making economic sense when you’re filtering 8+ gallons daily and want protection for appliances, shower water, and everything else.
Budget Reality Check
Let’s talk real numbers over five years:
Pitcher systems: $30-80 initial + $120-200 yearly in filters = $630-880 total
Under-sink systems: $150-800 initial + $50-150 yearly in filters = $400-1,550 total
Whole house systems: $800-3,000 initial + $100-300 yearly in filters = $1,300-4,500 total
But here’s what the numbers don’t show: convenience value, water quality improvement, and potential appliance protection with whole-house systems.
Living Situation: Apartment vs. House
Apartment renters: Stick with pitcher or portable under-sink models. You want something that moves with you and doesn’t require permanent installation. Many under-sink systems now offer countertop versions that connect to your faucet.
House owners: You have the luxury of choosing based on need rather than restrictions. Consider your long-term plans—if you’re staying put for 5+ years, investing in a permanent solution makes more sense.
New homeowners: Start with an under-sink system and upgrade to whole-house if needed. You’ll learn about your home’s water quality and usage patterns before making the bigger investment.
Maintenance Reality: What You’re Actually Signing Up For
Pitcher Filters: The Daily Dance
Refill 2-4 times daily for active households
Filter replacement every 40-60 gallons (roughly 2-3 months)
Regular pitcher cleaning to prevent mold and bacteria
Storage space for backup filters
Time investment: 5-10 minutes daily, plus monthly filter swaps
Under-Sink Systems: Set and Forget (Mostly)
Filter changes every 6-12 months depending on usage
Quick visual checks for leaks (rare but possible)
Annual system performance evaluation
Time investment: 30 minutes every 6-12 months, plus installation
Whole House Systems: The Commitment
Multiple filter changes on different schedules
System monitoring and pressure checks
Professional servicing every 1-2 years for complex systems
Seasonal adjustments for well water systems
Time investment: 2-4 hours annually, plus professional service costs
The Straight Talk: What Most People Actually Need
After analyzing hundreds of households, here’s what we see working in the real world:
Most urban and suburban families thrive with under-sink systems. They provide excellent water quality for drinking and cooking without the complexity of whole-house systems or the inconvenience of pitcher refilling.
Pitcher filters work best as starter systems or for specific situations—like offices, small apartments, or when you want to test water filtration before committing to something permanent.
Whole house systems make sense when you have specific problems to solve—hard water damaging appliances, well water with multiple contaminants, or family members with sensitivities to chlorine and chemicals.
Making Your Decision: The Simple Framework
Ask yourself these three questions:
What’s driving this decision? Bad taste, health concerns, or appliance protection? Different problems need different solutions.
How much filtered water do you actually use? Track it for a week—you might be surprised by the real numbers.
What’s your comfort zone for maintenance and investment? Be honest about what you’ll actually maintain long-term.
The Bottom Line
The best water filtration system is the one you’ll actually use consistently. A $200 under-sink system that provides years of great water beats a $2,000 whole-house system that gets neglected or a pitcher that sits empty because refilling it became a chore.
Start with your real needs, not your ideal scenario. You can always upgrade later, but you can’t get back the money spent on over-filtering or the frustration of dealing with a system that doesn’t fit your lifestyle.
Remember: perfect water isn’t the goal—consistently better water that fits your life is what really matters. Trust your assessment of your household’s actual patterns, and choose the system that supports your daily routine rather than complicating it.
Ready to make the call? Take a week to track your current water usage and identify your specific concerns. The right system will become obvious once you have real data about your household’s needs.
Bottom Line Up Front: Bad-tasting water isn’t just unpleasant—it’s your water telling you something important about what’s lurking in your pipes or supply. Whether you’re dealing with chlorine, metallic, sulfur, or musty flavors, there’s almost always a simple fix that doesn’t require expensive equipment or guesswork.
Water’s supposed to taste like… nothing. So when your tap suddenly tastes metallic, smells like rotten eggs, or has that unmistakable swimming pool flavor, it’s jarring. Don’t panic—most bad-tasting water isn’t dangerous, but it is trying to communicate with you.
Here at HydroBrewLab, we believe in empowering you with the knowledge to solve these problems systematically. Beyond surface-level hype about expensive filtration systems, we focus on what really works: identifying the root cause, understanding whether you need a temporary fix or permanent solution, and implementing the most effective approach for your specific situation.
We test, we compare, we care, and most of all, we listen to real people dealing with real water taste problems. This comprehensive guide will help you diagnose exactly what’s affecting your water’s taste and smell, then provide proven solutions that range from simple DIY fixes to targeted filtration systems.
Disclosure: As an Amazon Associate, HydroBrewLab earns from qualifying purchases. We only recommend products we’ve thoroughly tested and believe provide genuine value to our community. Your support helps us continue providing unbiased, data-driven reviews.
Understanding Your Water’s Story
Bad taste isn’t just about being picky—it’s often the first clue that something’s changed in your plumbing or water supply. Your water’s flavor is telling you a story about its journey from source to your glass, and learning to read these signs helps you solve problems more effectively.
The Science Behind Taste and Odor
Different compounds create distinct flavors and smells:
Chlorine compounds create sharp, chemical tastes
Hydrogen sulfide produces the unmistakable rotten egg smell
Metal ions from corroded pipes create metallic, bitter flavors
Organic matter causes earthy, musty, or swampy tastes
Mineral content affects overall taste profile and mouthfeel
Understanding what you’re tasting helps determine whether the problem originates from your municipal supply, your home’s plumbing, or temporary environmental factors.
The Big 4: Most Common Water Taste Problems
1. Chlorine Taste – “Swimming Pool Water”
What you’re experiencing: Sharp, chemical taste that reminds you of a public pool or bleach.
What’s happening: Municipal water systems add chlorine to kill bacteria, viruses, and other harmful microorganisms. Some neighborhoods closer to treatment plants get higher doses, making it more noticeable. The recommended level is typically 0.5-2.0 PPM, but chlorine can be tasted at just 1 PPM.
When it’s worse:
Peak usage times when water moves quickly from treatment plants
After maintenance work on municipal systems
During temporary supply direction changes
In areas close to water treatment facilities
Simple Solutions (Temporary Fixes):
The Refrigerator Method Fill a pitcher and refrigerate for 4-24 hours. Chlorine naturally evaporates, and cold water mutes unpleasant tastes. This costs nothing and works for most people bothered by chlorine taste.
Boiling Water Boil water for 15-20 minutes to evaporate chlorine. Not practical for daily use, but effective for cooking or immediate needs.
Let It Breathe Fill containers and leave uncovered for several hours. Chlorine dissipates naturally through exposure to air.
Filtration Solutions (Permanent Fixes):
Activated Carbon Filters The gold standard for chlorine removal. Carbon filters can remove 95-99% of chlorine while leaving beneficial minerals intact.
APEC WFS-1000 Under-Sink Filter 4.4/5 stars View on Amazon Removes 100% of chlorine in testing while maintaining healthy minerals. Easy installation and excellent taste improvement. Perfect for kitchen use without affecting whole-house water pressure.
PUR Classic 11-Cup Water Pitcher 4.3/5 stars View on Amazon Removes 95% of chlorine plus lead and fluoride. Most effective pitcher filter tested, with convenient pour-through design. Great option for renters or those wanting portable filtration.
2. Metallic Taste – “Pennies in Your Mouth”
What you’re experiencing: Bitter, metallic flavor that tastes like you’re sucking on coins or metal objects.
What’s happening: Water in contact with copper, iron, galvanized steel, or other metal pipes, tanks, or fittings picks up metal ions. This is more noticeable when water has been sitting in pipes (first thing in the morning) or when water is heated.
Common sources:
Copper pipes (taste threshold: 0.4-0.8 PPM)
Iron pipes or fixtures
Galvanized steel plumbing
Hot water heaters with corroded elements
Low pH (acidic) water accelerating corrosion
Simple Solutions (Temporary Fixes):
Flush Before Use Run cold water for 30-60 seconds before drinking, especially first thing in the morning. This draws fresh water through pipes and removes metallic taste from water that’s been sitting.
Use Only Cold Water Never use hot water for drinking or cooking. Hot water leaches more metals from pipes and contains higher concentrations of copper and other metals.
Morning Routine Always flush pipes before your first glass of water. Overnight sitting allows maximum metal leaching.
Filtration Solutions (Permanent Fixes):
Multi-Stage Carbon Block Filters These remove heavy metals while improving taste.
Waterdrop TSA Under-Sink System 4.5/5 stars View on Amazon 8-stage filtration including KDF media specifically designed for heavy metal removal. NSF/ANSI certified and removes copper, lead, and iron while improving taste. National Geographic recommended.
pH Correction Systems If your water is acidic (pH below 7), consider pH neutralization to prevent ongoing pipe corrosion.
3. Sulfur/Rotten Egg Smell – “Something Died in My Water”
What you’re experiencing: Unmistakable smell of rotten eggs or sulfur that can be detected even before drinking.
What’s happening: Hydrogen sulfide gas forms when sulfur bacteria break down organic matter in your well system, water heater, or plumbing. Even tiny amounts create strong odors.
Two main sources:
Water heater only: Bacteria in your hot water tank
All water: Groundwater contamination or well issues
Simple Solutions (Temporary Fixes):
Hot Water Heater Flush If the smell only comes from hot water:
Turn off power/gas to water heater
Flush the tank with chlorine bleach solution
Let sit for several hours
Flush thoroughly with fresh water
Temporary Chlorination Add small amounts of household bleach to affected water and let sit, then flush thoroughly. This kills bacteria temporarily but doesn’t address the source.
Filtration Solutions (Permanent Fixes):
Oxidizing Filters These convert hydrogen sulfide into particles that can be filtered out.
Air Injection Systems These oxidize sulfur compounds and filter them before they reach your taps.
AFW Filters Air Injection Platinum 10 System 4.3/5 stars View on Amazon Chemical-free air injection system that removes up to 15 PPM hydrogen sulfide, 20 PPM iron, and 6 PPM manganese. Features automatic backwashing with Fleck 2510SXT digital control valve and requires no chemicals or salt. Perfect for well water with multiple contaminant issues.
4. Musty/Earthy Taste – “Basement Water”
What you’re experiencing: Tastes like dirt, mold, or damp basement. May smell musty or swampy.
What’s happening: Several possible causes create this earthy flavor:
Algae growth in reservoirs (seasonal, especially summer)
Biofilm buildup in pipes or storage tanks
Decaying organic matter in water sources
Bacteria growth in plumbing systems
When it’s worse:
Summer months when algae blooms occur
After periods of non-use (vacation homes)
In areas with surface water supplies
Older homes with biofilm buildup
Simple Solutions (Temporary Fixes):
System Flush If your property has been empty, run all cold taps for 5-10 minutes to clear stagnant water.
Appliance Isolation Close taps for unused washing machines and dishwashers to prevent backflow.
Regular Use Keep water moving through your system. Stagnant water develops problems faster.
Filtration Solutions (Permanent Fixes):
Carbon Block Filters Effective against organic compounds causing earthy tastes.
UV + Carbon Systems Combination systems that kill bacteria and remove organic tastes.
iSpring WGB32B 3-Stage Whole House Water Filter System 4.4/5 stars View on Amazon 3-stage system with sediment filter plus dual carbon blocks removes 99% of chlorine plus organic compounds causing musty tastes. 100,000-gallon capacity with 15 GPM flow rate. Perfect for municipal water with taste and odor issues.
Advanced Taste Issues
Sweet Water
Cause: High mineral content (calcium, magnesium) or elevated alkalinity Solution: Usually not harmful, but water softening can reduce sweetness if desired
Salty Water
Cause: High chloride content, often from coastal areas or malfunctioning water softeners Solution: Reverse osmosis systems effectively remove salt
Chemical/Petroleum Taste
Cause: Industrial contamination, fuel leaks, or chlorine reactions with organic matter Solution: Immediately contact water utility or health department. May require specialized filtration
Bitter Water
Cause: High copper levels or excessive total dissolved solids (TDS) Solution: Copper removal filters or whole-house systems for high TDS
DIY Diagnostic Tests
The Source Test
Fill a glass from the problem tap
Take it to another room and smell/taste it
If the problem disappears, it’s likely your drain or sink area, not the water
The Hot vs. Cold Test
Test both hot and cold water separately
If only hot water has problems, focus on your water heater
If both are affected, it’s likely your supply or main plumbing
The Time Test
Test water first thing in the morning (after sitting in pipes)
Test again after running water for 2 minutes
If morning water is worse, you have pipe leaching issues
The Whole House Test
Test water from multiple taps throughout your home
If problems are isolated to one area, it’s localized plumbing
If widespread, it’s your supply or main line
When You Need Professional Help
Contact your water utility immediately if you experience:
Sudden changes in taste or smell
Chemical or petroleum odors
Any taste that makes water unpalatable
Colors other than clear
Oily films or unusual particles
Consider professional water testing for:
Well water (annual testing recommended)
Persistent problems after trying simple fixes
Multiple taste/odor issues simultaneously
Health concerns about contaminants
Call a plumber for:
Isolated problems in specific fixtures
Hot water heater issues
Suspected pipe corrosion
Installation of whole-house systems
Choosing the Right Filtration System
Point-of-Use vs. Whole House
Point-of-Use (Kitchen Sink) Systems:
Lower cost and easier installation
Perfect for drinking and cooking water
Doesn’t address bathing or appliance protection
Best for: Chlorine, taste, and odor issues
Whole House Systems:
Higher upfront cost but comprehensive protection
Protects appliances and plumbing
Improves water throughout your home
Best for: Multiple issues, well water, or whole-home problems
Filter Media Guide
Activated Carbon:
Removes: Chlorine, organic compounds, taste, odor
Doesn’t remove: Minerals, bacteria, heavy metals (alone)
Best for: Municipal water with chlorine taste
KDF (Kinetic Degradation Fluxion):
Removes: Heavy metals, hydrogen sulfide, some bacteria
Often paired with carbon for comprehensive filtration
Best for: Metal taste, sulfur smell, well water
Reverse Osmosis:
Removes: Nearly everything including minerals
Most comprehensive but removes beneficial minerals
Best for: Heavily contaminated water, salt removal
Catalytic Carbon:
Removes: Chloramines, some PFAS, advanced organic compounds
More effective than regular carbon for certain contaminants
Best for: Municipal water with chloramines
Temporary Fixes vs. Permanent Solutions
When Temporary Fixes Are Enough
Occasional chlorine taste:
Refrigerate water or let it sit out
Use during peak treatment periods only
Morning metallic taste:
Flush pipes before first use
Only affects first glass of the day
Seasonal musty taste:
Algae blooms that occur annually
Temporary issue lasting weeks, not months
When You Need Permanent Solutions
Daily taste problems:
Issues that affect your quality of life
Problems that persist despite simple fixes
Health concerns:
High levels of metals or contaminants
Well water with bacterial issues
Appliance protection:
Hard water affecting fixtures and appliances
Corrosive water damaging plumbing
Whole-house issues:
Problems affecting multiple taps
Issues with both hot and cold water
Maintenance and Long-Term Success
Filter Replacement Schedules
Carbon Filters: Every 6-12 months (varies by usage and water quality) Sediment Filters: Every 3-6 months RO Membranes: Every 2-3 years UV Lamps: Annually
Consistent taste issues: Under-sink filtration systems Multiple contaminants: Multi-stage countertop or under-sink units Moderate well water problems: Point-of-use RO systems
Comprehensive Solutions ($500-2000+)
Whole-house taste problems: Complete home filtration systems Well water with multiple issues: Air injection + carbon systems Severe contamination: Whole-house RO or specialized treatment
Trust HydroBrewLab to Keep Your Water Just Right
Bad-tasting water doesn’t have to be a permanent problem in your life. Understanding what your water is telling you—whether it’s chlorine from municipal treatment, metals from aging pipes, or organic compounds from natural sources—puts you in control of the solution.
The key is matching the right fix to your specific problem. Simple issues like chlorine taste often have simple solutions like refrigeration or basic carbon filtration. More complex problems involving metals, sulfur, or bacterial contamination require targeted approaches, but they’re still completely solvable with the right system.
Remember that taste problems are often the first warning sign of larger water quality issues. Addressing them promptly not only improves your daily quality of life but can also protect your plumbing, appliances, and health over the long term.
We’ve tested these solutions in real-world conditions and know what actually works versus what sounds good in marketing materials. Every recommendation in this guide is based on proven performance and real customer results.
Ready to solve your water taste problems once and for all? Start with the simple diagnostic tests in this guide, implement the appropriate temporary or permanent solution, and enjoy the confidence that comes with understanding and controlling your water quality. Your taste buds—and your peace of mind—will thank you.